

Manually Importing and Exporting Data
Working with Data
Section titled “Working with Data”Keboola Table Storage (Tables) and Keboola File Storage (File Uploads) are heavily connected together. Keboola File Storage is technically a layer on top of the Amazon S3 service, and Keboola Table Storage is a layer on top of a database backend.
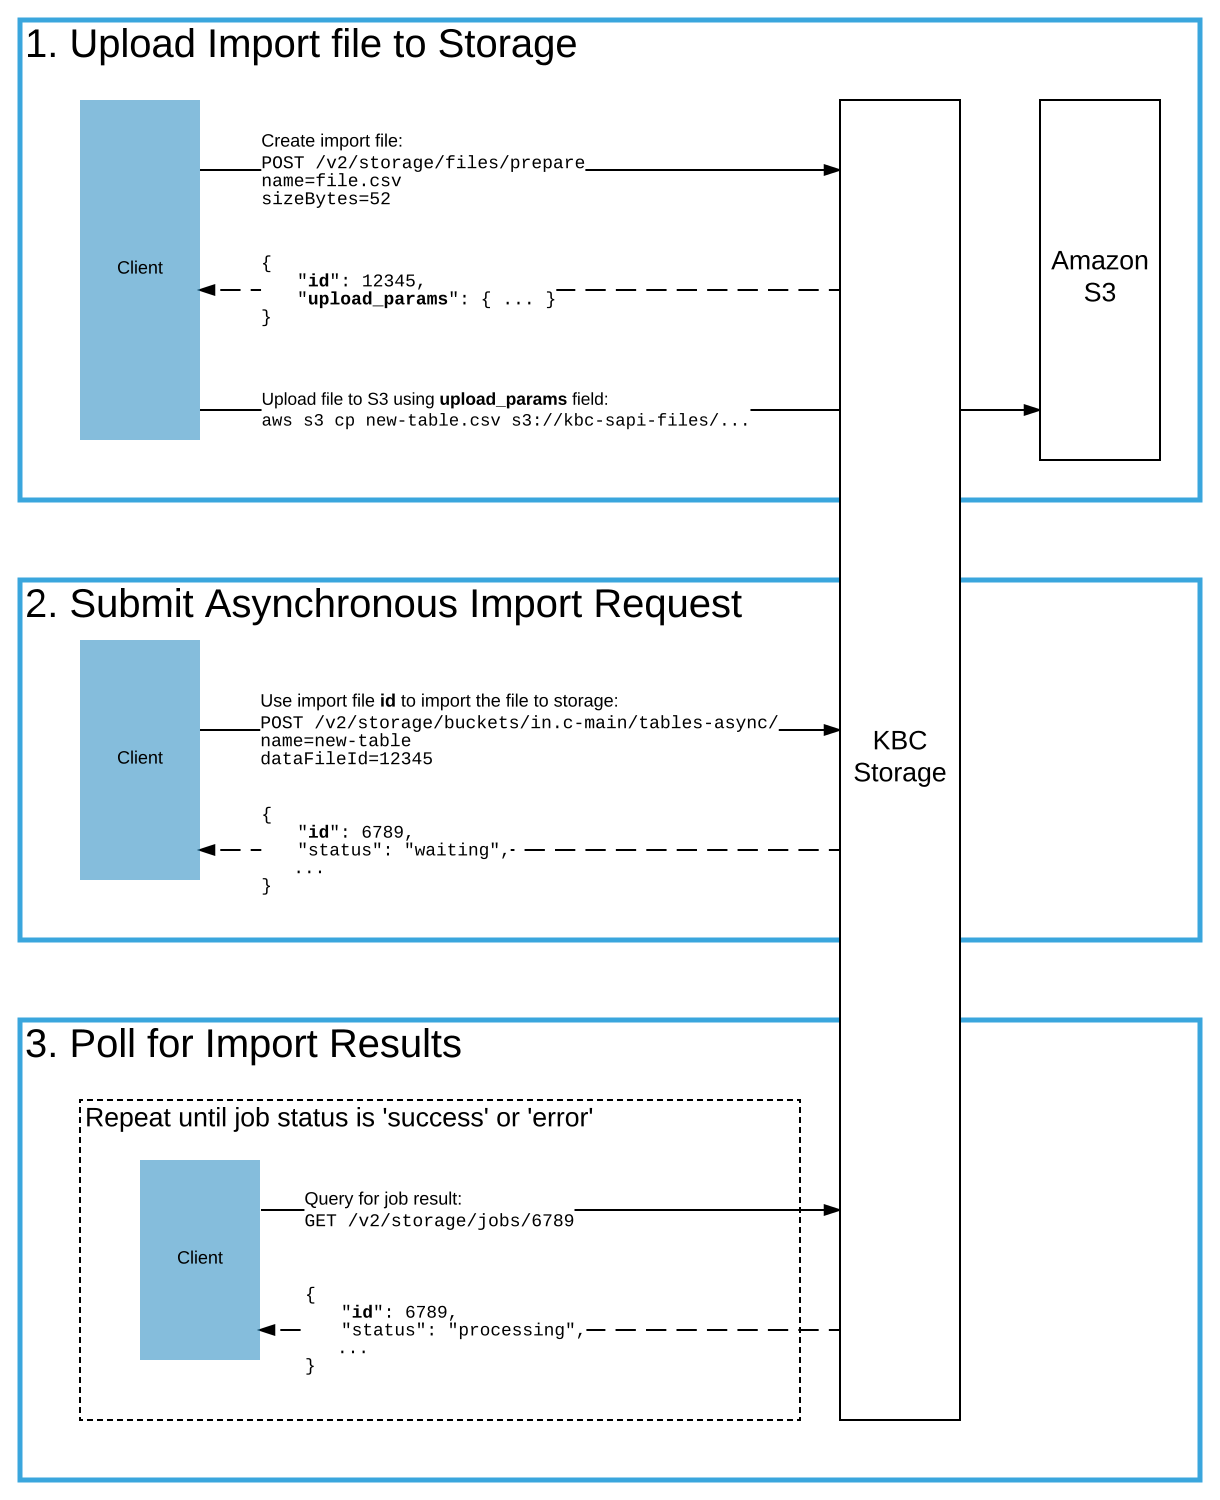
To upload a table, take the following steps:
- Request a file upload (opens in a new tab) from Keboola File Storage. You will be given a destination for the uploaded file on an S3 server.
- Upload the file there. When the upload is finished, the data file will be available in the File Uploads section.
- Initiate an asynchronous table import (opens in a new tab)
from the uploaded file (use it as the
dataFileIdparameter) into the destination table. The import is asynchronous, so the request only creates a job and you need to poll for its results. The imported files must conform to the RFC4180 Specification (opens in a new tab).
Exporting a table from Storage is analogous to its importing. First, data is asynchronously exported (opens in a new tab) from Table Storage into File Uploads. Then you can request to download the file (opens in a new tab), which will give you access to an S3 server for the actual file download.
Manually Uploading a File
Section titled “Manually Uploading a File”To upload a file to Keboola File Storage, follow the instructions outlined in the
API documentation (opens in a new tab).
First create a file resource; to create a new file called
new-file.csv with 52 bytes, call:
curl --request POST --header "Content-Type: application/json" --header "X-StorageApi-Token:storage-token" --data-binary "{ \"name\": \"new-file.csv\", \"sizeBytes\": 52, \"federationToken\": 1 }" https://connection.keboola.com/v2/storage/files/prepareWhich will return a response similar to this:
{ "id": 192726698, "created": "2016-06-22T10:44:35+0200", "isPublic": false, "isSliced": false, "isEncrypted": false, "name": "new_file2.csv", "url": "https://s3.amazonaws.com/kbc-sapi-files/exp-15/1134/files/2016/06/22/192726697.new_file2?X-Amz-Content-Sha256=UNSIGNED-PAYLOAD&X-Amz-Algorithm=AWS4-HMAC-SHA256&X-Amz-Credential=AKIAJ2N244XSWYVVYVLQ%2F20160622%2Fus-east-1%2Fs3%2Faws4_request&X-Amz-Date=20160622T084435Z&X-Amz-SignedHeaders=host&X-Amz-Expires=3600&X-Amz-Signature=86136cced74cdf919953cde9e2a0b837bd0b8f147aa6b7b30c2febde3b92d83d", "region": "us-east-1", "sizeBytes": 52, "tags": [], "maxAgeDays": 15, "runId": null, "runIds": [], "creatorToken": { "id": 53044, "description": "ondrej.popelka@keboola.com" }, "uploadParams": { "key": "exp-15/1134/files/2016/06/22/192726697.new_file2.csv", "bucket": "kbc-sapi-files", "acl": "private", "credentials": { "AccessKeyId": "ASI...H7Q", "SecretAccessKey": "QbO...7qu", "SessionToken": "Ago...bsF", "Expiration": "2016-06-22T20:44:35+00:00" } }}The important parts are: id of the file, which will be needed later, the uploadParams.credentials node,
which gives you credentials to AWS S3 to upload your file, and
the key and bucket nodes, which define the target S3 destination as s3://bucket/key.
To upload the files to S3, you need an S3 client. There are a large number of clients available:
for example, use the
S3 AWS command line client (opens in a new tab).
Before using it, pass the credentials (opens in a new tab)
by executing, for instance, the following commands
on *nix systems:
export AWS_ACCESS_KEY_ID=ASI...H7Qexport AWS_SECRET_ACCESS_KEY=QbO...7quexport AWS_SESSION_TOKEN=Ago...wU=or on Windows:
SET AWS_ACCESS_KEY_ID=ASI...H7QSET AWS_SECRET_ACCESS_KEY=QbO...7quSET AWS_SESSION_TOKEN=Ago...bsFThen you can actually upload the new-table.csv file by executing the AWS S3 CLI cp command (opens in a new tab):
aws s3 cp new-table.csv s3://kbc-sapi-files/exp-15/1134/files/2016/06/22/192726697.new_file2.csvAfter that, import the file into Table Storage, by calling either Create Table API call (opens in a new tab) (for a new table) or Load Data API call (opens in a new tab) (for an existing table).
curl --request POST --header "Content-Type: application/json" --header "X-StorageApi-Token:storage-token" --data-binary "{ \"dataFileId\": 192726698, \"name\": \"new-table\" }" https://connection.keboola.com/v2/storage/buckets/in.c-main/tables-asyncThis will create an asynchronous job, importing data from the 192726698 file into the new-table destination table in the in.c-main bucket.
Then poll for the job results, or review its status in the UI.
Python Example
Section titled “Python Example”The above process is implemented in the following example script in Python. This script uses the Requests (opens in a new tab) library for sending HTTP requests and the Boto 3 (opens in a new tab) library for working with Amazon S3. Both libraries can be installed using pip:
pip install boto3pip install requestsimport requestsimport osimport jsonimport boto3from time import sleep
storageToken = 'yourToken'# Source filename (including path)fileName = 'simple.csv'# Target Storage Bucket (assumed to exist)bucketName = 'in.c-main'# Target Storage Table (assumed NOT to exist)tableName = 'my-new-table'
print('\nCreating upload file')
# Create a new file in Storage# See https://api.keboola.com/?service=storage#post-/v2/storage/branch/-branchId-/files/prepareresponse = requests.post( 'https://connection.keboola.com/v2/storage/files/prepare', data={ 'name': fileName, 'sizeBytes': os.stat(fileName).st_size, 'federationToken': 1 }, headers={'X-StorageApi-Token': storageToken})parsed = json.loads(response.content.decode('utf-8'))# print(response.request.body)# print(json.dumps(parsed, indent=4))
# Get AWS CredentialsaccessKeyId = parsed['uploadParams']['credentials']['AccessKeyId']accessKeySecret = parsed['uploadParams']['credentials']['SecretAccessKey']sessionToken = parsed['uploadParams']['credentials']['SessionToken']region = parsed['region']fileId = parsed['id']
print('\nUploading to S3')
# Upload file to S3# See https://boto3.amazonaws.com/v1/documentation/api/latest/guide/configuration.htmls3 = boto3.resource('s3', region_name=region, aws_access_key_id=accessKeyId, aws_secret_access_key=accessKeySecret, aws_session_token=sessionToken)data = open(fileName, 'rb')s3.Bucket(parsed['uploadParams']['bucket']).put_object(Key=parsed['uploadParams']['key'], Body=data)
print('\nCreating table')
# Load data from file into the Storage table# See https://api.keboola.com/?service=storage#post-/v2/storage/branch/-branchId-/buckets/-id-/tables-asyncresponse = requests.post( 'https://connection.keboola.com/v2/storage/buckets/%s/tables-async' % bucketName, data={'name': tableName, 'dataFileId': fileId, 'delimiter': ',', 'enclosure': '"'}, headers={'X-StorageApi-Token': storageToken},)parsed = json.loads(response.content.decode('utf-8'))# print(json.dumps(parsed, indent=4))if (parsed['status'] == 'error'): print(parsed['error']) exit(2)
status = parsed['status']while (status == 'waiting') or (status == 'processing'): print('\nWaiting for import to finish') # See https://api.keboola.com/?service=storage#get-/v2/storage/jobs/-jobId- response = requests.get(parsed['url'], headers={'X-StorageApi-Token': storageToken}) jobParsed = json.loads(response.content.decode('utf-8')) status = jobParsed['status'] sleep(1)
# print(json.dumps(jobParsed, indent=4))if (jobParsed['status'] == 'error'): print(jobParsed['error']['message']) exit(2)Upload Files Using Storage API Importer
Section titled “Upload Files Using Storage API Importer”For production setup, we recommend using the approach outlined above with direct upload to S3 as it is more reliable and universal. In case you need to avoid using an S3 client, it is also possible to upload the file by a simple HTTP request to Storage API Importer Service.
curl --request POST --header "X-StorageApi-Token:storage-token" --form "data=@new-file.csv" https://import.keboola.com/upload-fileThe above will return a response similar to this:
{ "id": 418137780, "created": "2018-07-17T13:48:57+0200", "isPublic": false, "isSliced": false, "isEncrypted": true, "name": "404.md", "url": "https:\/\/kbc-sapi-files.s3.amazonaws.com\/exp-15\/4088\/files\/2018\/07\/17\/418137779.new-file.csv...truncated", "region": "us-east-1", "sizeBytes": 1765, "tags": [], "maxAgeDays": 15, "runId": null, "runIds": [], "creatorToken": { "id": 144880, "description": "file upload" }}After that, import the file into Table Storage by calling either Create Table API call (opens in a new tab) (for a new table) or Load Data API call (opens in a new tab) (for an existing table).
Working with Sliced Files
Section titled “Working with Sliced Files”Depending on the backend and table size, the data file may be sliced into chunks. Requirements for uploading sliced files are described in the respective part of the API documentation (opens in a new tab).
When you attempt to download a sliced file, you will instead obtain its manifest listing the individual parts. Download the parts individually and join them together. For a reference implementation of this process, see our TableExporter class (opens in a new tab).
If you want to download a sliced file, get credentials (opens in a new tab) to download the file from AWS S3. Assuming that the file ID is 192611596, for example, call
curl --header "X-StorageAPI-Token: storage-token" https://connection.keboola.com/v2/storage/files/192611596?federationToken=1which will return a response similar to this:
{ "id": 192611596, "created": "2016-06-21T15:25:35+0200", "name": "in.c-redshift.blog-data.csv", "url": "https://s3.amazonaws.com/kbc-sapi-files/exp-2/578/table-exports/in/c-redshift/blog-data/192611594.csvmanifest?X-Amz-Content-Sha256=UNSIGNED-PAYLOAD&X-Amz-Algorithm=AWS4-HMAC-SHA256&X-Amz-Credential=AKIAJ2N244XSWYVVYVLQ%2F20160621%2Fus-east-1%2Fs3%2Faws4_request&X-Amz-Date=20160621T135137Z&X-Amz-SignedHeaders=host&X-Amz-Expires=3600&X-Amz-Signature=ee69d94f0af06bcf924df0f710dcd92e6503a13c8a11a86be2606552bf9a8b26", "region": "us-east-1", "sizeBytes": 24541, "tags": [ "table-export" ], ... "s3Path": { "bucket": "kbc-sapi-files", "key": "exp-2/578/table-exports/in/c-redshift/blog-data/192611594.csv" }, "credentials": { "AccessKeyId": "ASI...UQQ", "SecretAccessKey": "LHU...HAp", "SessionToken": "Ago...uwU=", "Expiration": "2016-06-22T01:51:37+00:00" }}The field url contains the URL to the file manifest. Upon downloading it, you will get a JSON file with contents
similar to this:
{ "entries": [ {"url":"s3://kbc-sapi-files/exp-2/578/table-exports/in/c-redshift/blog-data/192611594.csv0000_part_00"}, {"url":"s3://kbc-sapi-files/exp-2/578/table-exports/in/c-redshift/blog-data/192611594.csv0001_part_00"} ]}Now you can download the actual data file slices. URLs are provided in the manifest file, and credentials to them are returned as part of the previous file info call. To download the files from S3, you need an S3 client. There are a wide number of clients available; for example, use the S3 AWS command line client (opens in a new tab). Before using it, pass the credentials (opens in a new tab) by executing , for instance, the following commands
on *nix systems:
export AWS_ACCESS_KEY_ID=ASI...UQQexport AWS_SECRET_ACCESS_KEY=LHU...HApexport AWS_SESSION_TOKEN=Ago...wU=or on Windows:
SET AWS_ACCESS_KEY_ID=ASI...UQQSET AWS_SECRET_ACCESS_KEY=LHU...HApSET AWS_SESSION_TOKEN=Ago...wU=Then you can actually download the files by executing the AWS S3 CLI cp command (opens in a new tab):
aws s3 cp s3://kbc-sapi-files/exp-2/578/table-exports/in/c-redshift/blog-data/192611594.csv0000_part_00 192611594.csv0000_part_00aws s3 cp s3://kbc-sapi-files/exp-2/578/table-exports/in/c-redshift/blog-data/192611594.csv0001_part_00 192611594.csv0001_part_00After that, merge the files together by executing the following commands
on *nix systems:
cat 192611594.csv0000_part_00 192611594.csv0001_part_00 > merged.csvor on Windows:
copy 192611594.csv0000_part_00 /B +192611594.csv0001_part_00 /B merged2.csv